Apple has finally introduced a long-awaited feature in macOS Sequoia: window tiling. This functionality has been a staple in Microsoft's operating systems for ages, and it's exciting to see Apple integrating it into their ecosystem. In this blog post, we'll guide you through using the new tiling feature in macOS Sequoia, ensuring you can work efficiently across multiple applications.
Installing macOS Sequoia Beta
Before diving into the tiling features, if you're interested in installing the macOS Sequoia beta version, check out the video linked in the description for a step-by-step guide.
How to Use Window Tiling in macOS Sequoia
Using the window tiling feature is straightforward. Here’s a quick guide:
Snapping Windows:
Drag and Snap: Click and hold the title bar of your app or window. Drag it towards the direction you want to snap it (left, right, top, or bottom). You'll see a preview of the snap before releasing the mouse button. Quarter Snapping: To snap a window to a quarter of the screen, drag it to a corner (top left, top right, bottom left, or bottom right). Enhanced Snapping with Option Key:
Press and hold the Option key while dragging and snapping a window. This gives you a more precise preview, allowing for a smoother snapping experience. Using Menu Options for Tiling:
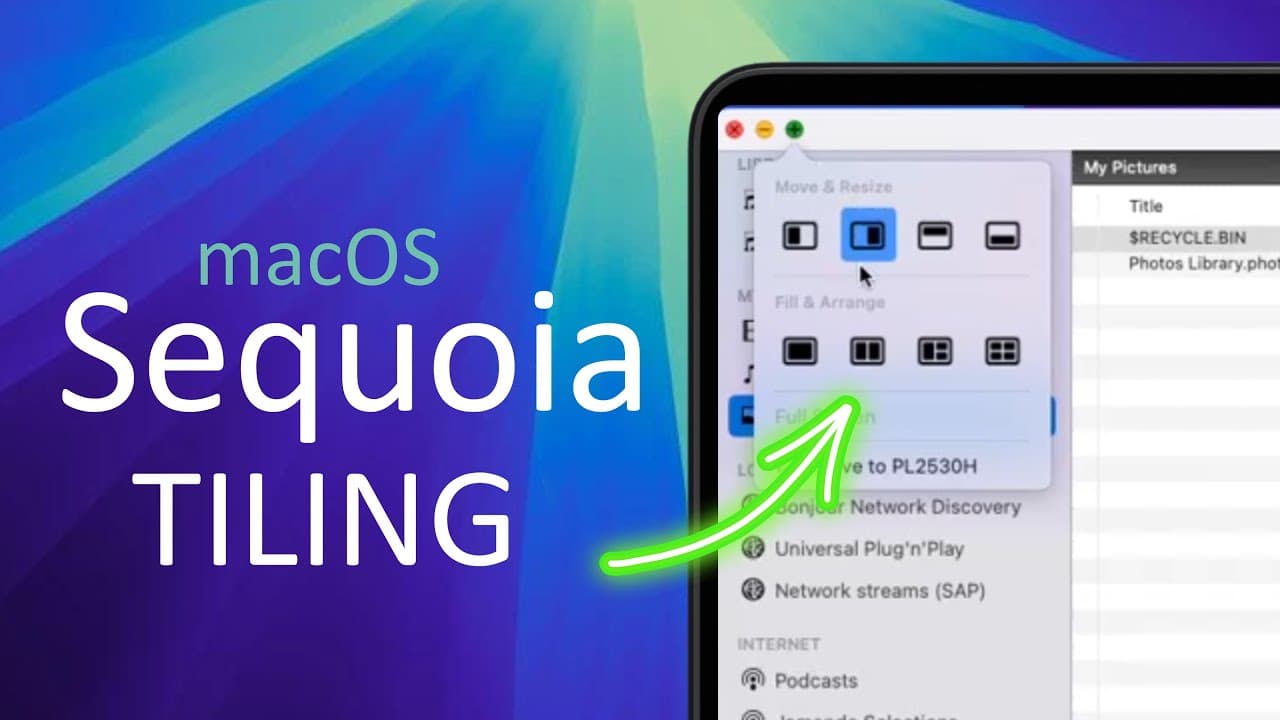
Go to the top menu bar, click on Window, then select Move and Size. Here, you can choose the direction (left, right, top, bottom) or the quarter of the screen where you want to snap your window. Managing Multiple Apps:
If you have multiple apps open and want to arrange them quickly, use the Quarters option to place four apps in each corner of your screen. Eliminating Gaps Between Windows One noticeable difference in macOS Sequoia's window snapping compared to Windows is the presence of gaps between snapped windows. If you prefer a seamless layout without gaps, follow these steps:
Click on the Apple icon and go to System Settings. Navigate to Desktop & Dock and scroll down to the Windows section. In the Window Snapping Group, turn off the Tile Windows Have Margins option. By disabling this feature, you can maximize your screen space without any wasted areas.
Conclusion
The tiling function in macOS Sequoia is a powerful tool for boosting productivity and organizing your workspace efficiently. We hope this guide helps you make the most out of this new feature. If you found this blog post helpful, please like and subscribe to Technoholic for more such content. Stay tuned for our next video, and until then, take care and bye-bye!

